Showing posts with label html. Show all posts

Tips & Tricks: Changing the favicon on your blog
school illustration

A favicon is the web nerd's name for the small icon shown next to URL in your browser's address bar, tabs or bookmarks. For example:


what is a favicon 2

what is a favicon 1

Favicons are a way to customize your blog, and make it stand out from 'the next one'.

Interested? There are three steps to take to change the favicon for your blog:
- Create the favicon itself
- Host the favicon on an external image hosting service
- Change the <head> section of your blog


1. Create the favicon

Favicons are "icons", small images with a specific file format, different from .jpg, .png or .gif. They have the ".ico" file extension, e.g. "theroad.ico".

There are several online tools available to convert an image from the most popular image formats to an icon. I use the one from DynamicDrive.

You achieve the best results by using a square picture without too many details or colours as it will be reshaped to a 16x16 pixel format.

As a favicon is a "public relations" tool for your blog, use an image that somewhere typifies or represents your blog.

After uploading your original to DynamicDrive, click on "Create Icon" and you will see in the preview how your favicon will look like after you have done the next steps.

First, click 'Download Favicon" to store it on your computer. On DynamicDrive, the file will always have the format "favicon.ico" or (if one already exists) "favicon(1).ico" etc..


2. Host the favicon on an external image hosting service

The favicon needs to have the ".ico" extension. Most of popular image hosting services do not support images of the ".ico" format, so you won't have any joy using Flickr, ImageShack, XS.to, TinyPic etc.. But here are a few free image hosting services that do support ".ico" files: Oogletoogle, PicPanda, ImageBoo and CDMazika.

After you upload your favicon, the hosting service will give you a URL, refering to your picture, e.g. http://images.cdmazika.com/images/2f2stqn1k1p7diu5y6qs.ico

Make sure you don't loose that URL!


3. Changing the <head> section of your blog.

This is a bit tricky, as it changes slightly from blogplatform to blogplatform.
Bottomline is: you need to edit the HTML template of your blog to either change or add a line.

How you get to the HTML template of your blog, depends on your blogplatform.
On Blogger, you go to Layout>Edit HTML> and click on 'Expand Widget Templates'
On Tumblr, go to the Dashboard>'Customize'>Theme

Before you do anything else, PLEASE take a backup of your template. A corrupted template is one of the worst thing that can happen to a blogger.
Blogger lets you download your template, but in Tumblr e.g. you will need to copy/paste it into Notepad.

Anywhere between the <head> and </head> codes, look for something that defines your current favicon. It will look like this:

<link rel="shortcut icon" href="/directory/faviconame.ico"/>

("faviconame.ico" might have another name (ending in ".ico"), or contain a variable.

In Tumblr, the HTML line looks like this:

<link rel="shortcut icon" href="{Favicon}"/>

Blogger, on the contrary, does not store the favicon in the HTML code (as they always use the standard blogger favicon).

Now you need to either change that line of code (if it exists) or add one (if the favicon is not defined in your HTML template).

In Tumblr:

<link rel="shortcut icon" href="http://images.cdmazika.com/images/2f2stqn1k1p7diu5y6qs.ico"/>

In Blogger (mind the SINGLE quotes) add this line:

<link rel='shortcut icon' href='http://images.cdmazika.com/images/2f2stqn1k1p7diu5y6qs.ico'/>

Make sure you use the URL given for your .ico file.

Save the template and "Klaar is Kees". You are ready...
happy

Pretty amazing stuff, no? :-)

Note you might need to restart your browser or empty your browser cache before you see the favicon (Internet Explorer is particularly bad at refreshing the favicon).

More blogging tips on The Road.

Read the full post...

Tips & Tricks: Matching Colours on Your Blog

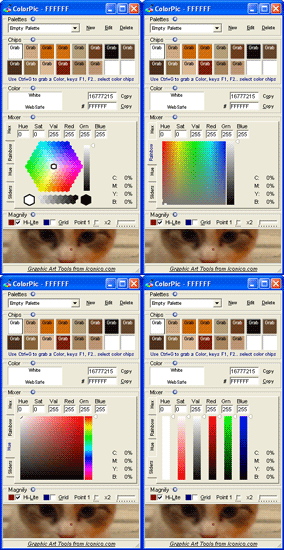
I had a lot of trouble matching backgrounds of frames, widgets etc.. to the background of my website. I could only find matching colours after hours of trying... Until I found this free tool: Colorpic.

ColorPic

It is a simple and free Windows program that lets you zoom into any area on your screen - including into your browser window. With a magnifying glass, you go over an area, and it tells you the hex value of the colour on that spot of your screen.

Matching colours became a breeze for me.

Have fun.

More Blogging "Tips and Tricks", you find here.

Read the full post...

Tips & Tricks: How to speed up your blog

Speed up your website!Just like many blogs, The Road to the Horizon grew from a blog with a simple plain template to what it is now: a site combining pictures, links, widgets and text.
Came a time, a few weeks ago, I realized it took almost 30 seconds to fully download the homepage of my blog, on an ADSL or cable connection. Around the same time I travelled to Addis Abeba in Ethiopia, and was surprised to see it took over two minutes to download my page when one had more limited connectivity.

Why is speed important?

Many visitors will come to your blogsite “by accident”, through a referral link or more commonly, through a Google search. In just a few seconds, these “incidental visitors” will decide whether your site is interesting or not. In just a few seconds, they will decide if they will stay, or not. We also have just a few seconds to turn him from an occasional (or unique) visitor to a regular ‘customer’, someone who will come back, bookmarking your blog, or even post it on social networks.

A couple of factors are important in this ‘flash’ decision “will I stay or not”:
1. the overall appearance or impression of the site (which they will evaluate on what they see on the top screen without even scrolling down), and
2. the download speed.

The download speed became even more important when Internet Explorer versions 7 and 8 seems to ‘block’ for seconds, while in the middle of download if they need to wait for certain widgets to complete.

So, I had to improve my download speed. Here is what I have learned:


1. Benchmark your site’s speed

Measure the speed before and after you make the improvements. Try selfseo.com (which specifies if a page doesn't load within 5-8 seconds according to their benchmark you will lose 1/3 of your visitors.) or linkvendor.com or for a more in depth analysis, use websiteoptimization.com.

Each time you change something on your site, measure what difference the change made.

Two good tools to find out what specific parts (widgets, images, scripts,..) are slowing down your site, two great tools are Firefox Firebug and the Chrome Developer tools .
Firebug is an add-on to Firefox (download here). The Chrome tool comes built-in (goto menu>developer>Javascript console and click on Resources).


2. Slow items go last:

Have a look in what sequence your blog loads. E.g. in the case of The Other World News, the sequence is:
1st the header
2nd the left column
3rd the middle column with the posts
4th the right column
5th the bottom banner.

In the case of The Road, the sequence is:
1st the header banner
2nd all blog posts with the pictures
3rd the whole right column (darker grey), item per item.
4th the bottom banners (darker grey)

This means, if I would put something in the banner or in any of the blog posts that would not work properly, or would be slow, the rest of the page’s download will slow down.

An example:, I had a widget which often had speed problems, as one of the first things to download on The Road’s right column. It often kept the whole download of the rest of the right column on hold for at least 10 seconds. I moved that widget to the part of my page which loads last (the bottom), for visitors not to notice the delay.

Recommendation: ensure you put the slower widgets, or those taking a long time to load, at the end of your download cycle.


3. Compress your pictures.

Most people think because they use small pictures, these automatically take little time to download. Not necessarily so. It depends on the data-size (kbytes) of your picture.

Check your pictures by right-clicking on them and select ‘Properties’.
A typical 400 x 300 pixel picture should not take more than 20-40 kbyte. Often people use > 100 kbyte. A couple of those pictures and your download speed will be a killer.

I posted before about ShrinkPic, a tool I used to compress pictures, but lately I use Picasa, a free picture library and processing tool that lets you export pictures with predefined pixel size, quality and compression rate. The visual quality of compressed Picasa pictures is very good (and much better than with ShrinkPic tool I used before.

Pay particular attention to your banner: because banners are often larger than normal pictures, and is the first thing your page will download (and the first thing the users will see), compressing it is critical (The Road’s banner is 12 Kbyte, as an example). There is nothing as frustrating for a user than to sit and wait for a banner to download.


4. Limit your widgets

This has been a killer for me. I loved to add little gimmicks – “widgets”, that showed the ‘latest visitors’, or “the weather where I am”, or “the latest comments”, or “all countries of the latest visitors”, etc..

That killed my speed. I could see so, when using Mozilla’s Firefox to download my page, and to observe what Firefox was waiting for (check the bottom left of the Firefox window)…

Recommendations:
a. Limit the number of of gimmicks and widgets
b. Delete those widgets which are slow
b. Those which are slow, and you really really wanted to keep, put at the bottom of your page (or whatever part of your page which downloads last – see point two).


5. Store widget and badge icons on your picture server

Often, widgets or badges (like this one ) come by default with the “img” link to an icon stored by the service you are referring to.

I had a lot of these on my site (e.g. in the syndication part at the bottom of my page), and found out that in average at least one of these services would be down or slow, thus slowing down MY page…

The remedy is to store these icons on your trusted image server (e.g. Picasa or Flickr).
How?
1. You rightclick on the icon as you have it on your page
2. Choose ‘Save as’
3. Then upload that image to your picture server
4. In the "IMG" tag, replace the URL of the picture with the one on your picture server.


6. Limit or speed up RSS feeds

I RSS feeds to show the latest news bulletins or to display the latest comments on my blog. Feeds take some time to download, and not all servers are fast.

The speed of my site increased quite a bit when I moved the feeds onto Newsgator, a free feed service. They are fast and reliable. You can quite easily combine your feeds with free Yahoo Pipes.

Have fun!

Check out more blogging tips and tricks on The Road.

Picture courtesy vintage-poster.info

Read the full post...

Tips & Tricks: Displaying Special Characters

You probably had instances where you need to display a piece of HTML code 'as is' on your blog, or where you need to use special characters like '<' or '>' etc..
Internet browsers easily get confused and often interpret these special characters as HTML code, resulting in goobledegoock displayed on the screen.

You might have discovered already that, to display special characters, you need to replace these with a code, prefix-ed with '&', called 'encoding'.
So if you want:

<a href="http://theroadtothehorizon.blogspot.com"> The Road to the Horizon</a>

to be displayed as is, on your page, it would have to be encoded like this:

&lt;a href=&quot;http://theroadtothehorizon.blogspot.com&quot;&gt;The Road to the Horizon&lt;/a&gt;

Check out this reference article listing all the special characters.

But, this becomes really cumbersome if you want to display whole lines of HTML code or a piece of text with a lot of these special codes in it. Here is a tool I use often to translate those coded passages with special characters.
Just cut and paste your text, as you want to have it displayed in the browser of your visitors (including all those special characters) onto the form in this page, and hit 'encode'. Copy and paste the resulting special code into your blog. Et voila! Finished!

Hope this helps.

Peter

More Blogging "Tips and Tricks", you find here.

Read the full post...

Tips & Tricks: Text within a Scroll bar

HTML is really much easier than it looks. Ok, let me re-state that: when publishing a blog, the groundwork is already done for us. We are left to play with the goodies: fiddling around with the text and images. And fiddling we do!

Someone asked me how to put a text within a scroll bar. Like this:

your text goes here. Actually, you can include anything you want: a picture, text, video etc...
sunrise march 2007

Using scrollbars is any way to put a lot of information, which is not relevant to your actual text, within a limited space


The HTML code for the scroll bar above is:

<div style="border:1px black solid; width:300px; height:50px; overflow:auto;padding-left: 4px; ">
your text goes here.
</div>

You can easily expand the div with other features, bells and whistles.

More tips and tricks for bloggers, you find here.

Read the full post...

Tips & Tricks: Scrolling Text in a Frame. A Ticker Box!

I wanted to put the latest updates and some statistics of my blog in one of the side columns, but hated the amount of space the text took up.

For quite a while now, I tried to find a simple way to put scrolling text in a box, often called a 'ticker', as that seemed a nice way to condense the space the information took up.

You can find several ways to do this, often involving scripts etc.., but the simpliest I found is by using a 'marquee'.

A marquee begins <marquee withsomequalifiers> and ends with </marquee>. Everything inbetween will be displayed 'in a scrolling way'

Some simple tutorials on the use of marquees, you can find in the HTML code tutorial and on HScripts.

...But it is really easy. The one I use on my page is:

<marquee onmouseover="this.stop();"
style="BORDER-RIGHT: 1px solid;
PADDING-RIGHT: 4px;
BORDER-TOP: 1px solid;
PADDING-LEFT: 4px;
PADDING-BOTTOM: 5px;
BORDER-LEFT: 1px solid;
PADDING-TOP: 5px;
BORDER-BOTTOM: 1px solid"
onmouseout="this.start();"
scrollamount="1"
hspace="5"
vspace="5"
scrolldelay="100"
direction="up"
width="247"
bgcolor="#eeeeee"
height="40">

<center>
This is your text<br/>
<a href="http://theroadtothehorizon.blogspot.com">Or put a URL in it!</a><br/>
but you can add whatever you want!</br>
</center>

</marquee>

and this is how it looks like:

This is your text
Or put a URL in it!
but you can add whatever you want!


As you can see, the qualifiers are simple and self-explanatory. You can basically define everything from the width, height, background colour, framesize/colour, to the direction of the text-scrolling, scrolling speed etc...

Note I used the onmouseover and onmouseout functions within the marquee definition. This is a bonus. Both functions ensure the scrolling stops if you put the mouse within the area of the marquee. I used it so that people can click on one of the URLs I defined, which refer to a shortstory.

Have fun!

Peter

More Blogging "Tips and Tricks", you find here.

Read the full post...

Tips & Tricks: A Guestbook with Buttons

This summary is not available. Please click here to view the post.

Read the full post...
.

  © Blogger template The Business Templates by Ourblogtemplates.com 2008

Back to TOP